并行包使用 Java从1.5开始提供了并发工具包java.util.concurrent,极大简化了多线程编程的难度。源码来自大神Doug Lea的个人贡献,如果你在JDK1.4.2下做过多线程网络编程,你就知道这有多重要。
并发包中提供了高性能且线程安全的集合类以及并发场景中常用的并发锁和原子操作类。本文仅介绍如何使用并发包中的类,对于其底层原理和实现,将另开章节进行讨论。
具体介绍每一个类之前,先做一个横向对比,可以更容易理解并行包引入这些类的目的。
基础类或方法
并行包类
作用
HashMap
ConcurrentHashMap
Map
wait()/notify()
BlockingQueue
线程通信
join()
CountDownLatch
一个线程等待其他线程
CyclicBarrier
多个线程互相等待,到一个点后共同执行
synchronized
Semaphore
控制多线程并发数量
synchronized
ReentrantLock
并发锁
Integer
AtomicInteger
原子操作类
ConcurrentHashMap 先做一个对比
Map类
说明
HashMap
线程不安全,多线程扩容可能出现循环链表导致get()方法空转(JDK1.8以前)
HashTable
线程安全,用synchronized锁定读写方法,锁住整个Map,效率低
ConcurrentHashMap
线程安全,使用Segment减小锁的颗粒度,效率高
使用方法和HashMap一样,只需要把new HashMap() 改成new ConcurrentHashMap() 即可。
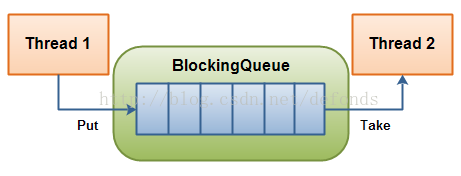
BlockingQueue 顾名思义,这是一个阻塞队列。使用BlockingQueue可以方便的实现线程之间的通信,典型的就是生产者-消费者模式。BlockingQueue一般都是FIFO先进先出的,和排队一样。从下图中可以看出,这就是producer和consumer,换句话说,之前我们通过wait()/notify()自己实现了生产者和消费者,直接使用BlockingQueue也可以达到同样的效果,而且更简单。
下面看看如何使用BlockingQueue实现生产者-消费者
public class BlockingQueueExample private final static Logger logger = LoggerFactory.getLogger(BlockingQueueExample.class); public static void main (String[] args) throws InterruptedException BlockingQueue queue = new ArrayBlockingQueue(5 ); Producer producer = new Producer(queue); Consumer consumer = new Consumer(queue); new Thread(producer).start(); new Thread(consumer).start(); } public static class Producer implements Runnable protected BlockingQueue queue = null ; protected int count = 0 ; public Producer (BlockingQueue queue) this .queue = queue; } public void run () while (count < 20 ) { try { count++; queue.put(new Integer(count)); logger.info("put " + count); Thread.sleep(100 ); } catch (InterruptedException e) { e.printStackTrace(); } } } } public static class Consumer implements Runnable protected BlockingQueue queue = null ; public Consumer (BlockingQueue queue) this .queue = queue; } public void run () while (true ) { try { logger.info("get " + queue.take()); Thread.sleep(500 ); } catch (InterruptedException e) { e.printStackTrace(); } } } } }
首先,创建一个线程共享的BlockingQueue对象,
然后,生产者调用put()方法往队列里放数据,消费者调用take()方法从队列中取数据;
数据按照FIFO的规则先进先出,put()方法新增数据到队列末尾,take()方法从队列头读取并移除数据;
put()方法和take()方法都可以阻塞:如果队列满了,put()方法阻塞;如果队列空了,take()方法阻塞。
BlockingQueue是一个接口
package java.util.concurrent;public interface BlockingQueue <E > extends Queue <E > void put (E e) throws InterruptedException E take () throws InterruptedException ; }
ArrayBlockingQueue
使用数组实现阻塞队列,队列大小有上限。
LinkedBlockingQueue
使用链表实现阻塞队列,每个元素通过next指针链接到下一个元素;队列默认最大Integer.MAX_VALUE,也可以自定义;
SynchronousQueue
队列中最多只能有一个元素,效果和ArrayBlockingQueue(1)是一样的。
看上去很眼熟吧,这就是ThreadPoolExecutor的三种排队策略:有界队列、无界队列和0队列。
CountDownLatch latch[lætʃ] 是门闩的意思,CountDownLatch就是倒数的门闩。我的理解就是:有N个门锁,一个一个打开,都打开就可以离开了。中文翻译我觉得应该是倒计数锁 。
下面看一个例子:初始化counter计数为2,每次调用counter.countDown(); 计数器减1,counter.await(); 方法阻塞到计数器为0时返回,起到和join()方法一样的效果。
public class CountDownLatchExample public static void main (String[] args) throws InterruptedException CountDownLatch counter = new CountDownLatch(2 ); Task task1 = new Task(1000 , counter); Task task2 = new Task(2000 , counter); task1.start(); task2.start(); counter.await(); System.out.print("done" ); } public static class Task extends Thread private long time = 0 ; private CountDownLatch counter; public Task (int time, CountDownLatch counter) this .time = time; this .counter = counter; } @Override public void run () try { Thread.sleep(time); this .counter.countDown(); } catch (InterruptedException e) { e.printStackTrace(); } } } }
CountDownLatch与join()的联系和区别:
CountDownLatch和join()都可以实现主线程等待子线程完成后再继续的效果,例如:我们的测试例子中很多时候main()方法都需要启动子线程,通过CountDownLatch和join()可以准确等到子线程执行完成后输出测试信息,否则我们只能在主线程中Thread.sleep(),看上去就很弱,另外sleep多长时间很不好确定;
调用thread.join()方法必须等thread线程执行完成才返回,而CountDownLatch只要检测到计数器为0就可以返回(thread线程可以在执行过程中进行countDown()操作),所以CountDownLatch通过计数器提供了更灵活的控制机制;
我们通常使用线程池启动子线程,子线程只需要实现runnable接口,这种情况下Thread类对象是封装在线程池里面的,我们不方便拿到,也就不方便调用它的join()方法;使用CountDownLatch就简单多了,只需要在run()方法退出前调用countDown()方法即可;
综上,实战中CountDownLatch的应用场景比join()多。
CyclicBarrier 循环栅栏,和CountDownLatch有点像。CountDownLatch是一个线程等待其他线程的任务全部完成或者部分完成,然后才能继续进行。例如:厨艺比赛,大厨有几个助手分别做主菜、配菜、甜点,都好了,大厨宣布完成。CyclicBarrier也是线程等待,但不是一个线程等待其他线程,而是多个线程之间互相等待,都等到一个时间点以后再继续进行。例如:集体旅游,所有人都到达第一个景点以后,再出发去第二个景点。
还是看代码更容易理解
public class CyclicBarrierExample public static void main (String[] args) CyclicBarrier barrier = new CyclicBarrier(2 , new MainTask()); Task task1 = new Task(1000 , barrier); Task task2 = new Task(2000 , barrier); task1.start(); task2.start(); } public static class MainTask implements Runnable @Override public void run () System.out.println("MainTask run()" ); } } public static class Task extends Thread private long time = 0 ; private CyclicBarrier barrier; public Task (int time, CyclicBarrier barrier) this .time = time; this .barrier = barrier; } @Override public void run () try { Thread.sleep(time); this .barrier.await(); } catch (InterruptedException e) { e.printStackTrace(); } catch (BrokenBarrierException e) { e.printStackTrace(); } } } }
首先,CyclicBarrier可以指定一个barrierAction,当所有线程都到达barrier后执行;
也可以不指定barrierAction,那么CyclicBarrier看上去就和CountDownLatch很像了。
CyclicBarrier和CountDownLatch的区别:
CyclicBarrier是子线程之间的互相等待,在子线程内调用barrier.await(); 相当于这个子线程已经到达栅栏点,等到所有子线程全部到达栅栏点时,所有这些子线程全部同时被唤醒,继续执行;
CountDownLatch是主线程等待子线程,各个子线程之间没有关系;
CyclicBarrier如果设置了barrierAction,相当于可以触发主线程继续操作。
Semaphore 信号量这个词用的比较多,Java中的含义是控制并发线程数量。我们知道synchronized同步代码块有加锁和释放锁的机制,可以认为synchronized只有1把锁,而Semaphore是N把锁。
Semaphore最多可以被锁N次,以后再试图加锁就会失败,必须等前面的线程释放锁。
public class SemaphoreExample private static Semaphore semaphore = new Semaphore(5 ); private final static Logger logger = LoggerFactory.getLogger(SemaphoreExample.class); public static void main (String[] args) ExecutorService threadPool = Executors.newFixedThreadPool(30 ); for (int i = 0 ; i < 20 ; i++) { threadPool.execute(new Runnable() { @Override public void run () try { logger.info("run" ); semaphore.acquire(); Thread.sleep(1000 ); semaphore.release(); logger.info("done" ); } catch (InterruptedException e) { e.printStackTrace(); } } }); } } }
调用acquire()方法获得锁,计数加1;
调用release()方法释放锁,计数减1;
没有空闲锁的时候acquire()方阻塞等待;
ThreadPoolExecutor 单独有说明,这里不再重复。
AtomicInteger 保证读写是原子操作的Integer。i++ 不是原子操作,实际是三步:第一步从内存读取数据到寄存器,第二步寄存器数值加1,第三步回写寄存器数值到内存。
package java.util.concurrent.atomic;public class AtomicInteger extends Number implements java .io .Serializable public final int addAndGet (int delta) public final int getAndAdd (int delta) public final int incrementAndGet () public final int getAndIncrement () public final boolean compareAndSet (int expect, int update) }
为什么用AtomicInteger替换Integer?还是线程安全问题。
下面的代码,启动100个任务,每个任务自增100次,正确的计算结果应该是10000。但是,如果我们像这么这样写代码,最后输出的sum结果很可能不是10000。原因就在于sum++操作不是线程安全的。
例如:当前主内存中sum的值是100,两个线程同时把100读取到自己的工作内存中,实现+1操作,最后两个线程都回写101到主内存,实际上我的期望值是102。
public class AtomicIntegerExample private static int sum = 0 ; public static void main (String[] args) Task task = new Task(); ExecutorService executorService = Executors.newFixedThreadPool(100 ); for (int i=0 ; i<100 ; i++) { executorService.execute(task); } try { Thread.sleep(2000 ); } catch (InterruptedException e) { e.printStackTrace(); } System.out.println("sum=" + sum); } public static class Task implements Runnable @Override public void run () for (int i=1 ; i<=100 ; i++) { sum ++; } } } }
使用synchronized可以实现线程安全,但是基于悲观锁的思路,效率太低。可以将int替换为AtomicInteger,既实现线程安全,又保证了效率(基于CAS的乐观锁)。
public class AtomicIntegerExample private static AtomicInteger integer = new AtomicInteger(); public static class Task implements Runnable @Override public void run () for (int i=1 ; i<=100 ; i++) { integer.incrementAndGet(); } } } }
注意:这里使用volatile是不能保证线程安全的,因为++操作线程不安全。
private static volatile int sum = 0 ;
虽然给sum增加了volatile关键字,但是最后的计算结果也可能不是10000。volatile关键字保证可见性和不重排序,就是每次读数据时,从主内存同步到工作内存,每次回写数据时,立即同步到工作内存。但++操作是在CPU寄存器内的操作,不会立即同步到工作内存,当然也不会立即同步到主内存。
对于任意单个volatile变量的读写具有原子性,但类似于volatile++这种复合操作不具有原子性。
ReentrantLock 并发包提供了重入锁,用来代替synchronized
public class LockExample private final static Logger logger = LoggerFactory.getLogger(LockExample.class); public static void main (String[] args) Lock lock = new ReentrantLock(); Task task1 = new Task(1000 , lock); Task task2 = new Task(2000 , lock); task1.start(); task2.start(); } public static class Task extends Thread private long time = 0 ; private Lock lock; public Task (int time, Lock lock) this .time = time; this .lock = lock; } @Override public void run () try { logger.info("run" ); lock.lock(); Thread.sleep(time); logger.info("done" ); } catch (InterruptedException e) { e.printStackTrace(); } finally { lock.unlock(); } } } }
以下两种代码是等价的,都可以起到同步锁的作用
使用synchronized
synchronized (Task.class) {
  try {
    Thread.sleep(time);
  } catch (InterruptedException e) {
    e.printStackTrace();
  }
}
使用ReentrantLock
try {
  lock.lock();
  Thread.sleep(time);
} catch (InterruptedException e) {
  e.printStackTrace();
} finally {
  lock.unlock();
}
注意:请在finally里释放锁。
ReentrantLock能替换synchronized吗
道理上讲,肯定是可以的,实战中根据实际情况选择,没有必要教条的一定要用ReentrantLock。首先,ReentrantLock能实现synchronized的全部功能,而且还提供了更多方法,功能更强大,某些情况下效率也更高。不多,synchronized就一无是处吗?synchronized的好处是简单,在实战中简单就意味着bug少。试想,如果使用ReentrantLock忘记调用lock.unlock(); 或者某些异常情况下lock.unlock(); 没有执行怎么办。功能强大的副作用就是复杂,容易出错。
下面再来看看ReentrantLock增加的功能
并行包中的Lock接口提供了tryLock()功能,注意lock()和unlock()方法都是没有返回值的,lock()如果得不到锁会一直阻塞。tryLock()方法试图立即锁定Lock实例,如果锁定成功 true,如果Lock实例已被锁定返回 false。
package java.util.concurrent.locks;public interface Lock void lock () void unlock () boolean tryLock (long time, TimeUnit unit) throws InterruptedException }
tryLock()方法可以避免某个线程由于线程饥饿得不到锁,一直阻塞在lock(),为我们提供了错误处理的机会。
public static class Task extends Thread private long time = 0 ; private Lock lock; public Task (int time, Lock lock) this .time = time; this .lock = lock; } @Override public void run () boolean getLock = false ; try { logger.info("run" ); int count = 0 ; while (!getLock) { getLock = lock.tryLock(100 , TimeUnit.MILLISECONDS); count++; if (count > 5 ) { break ; } } if (!getLock) { logger.error("lock failed" ); return ; } Thread.sleep(time); logger.info("done" ); } catch (InterruptedException e) { e.printStackTrace(); } finally { if (getLock) { lock.unlock(); } } } }
上面为使用tryLock()方法的代码,比使用lock()要复杂一些,但是更加实战。尤其在分布式环境中,抢不到锁时返回错误比阻塞在那里等HTTP调用超时要好得多。
ReadWriteLock 读写锁就是两个锁,一个读锁,一个写锁,适合读多写少的情况。读锁可以加锁多次,写锁智能加锁一次。
ReadWriteLock lock = new ReentrantReadWriteLock();
lock.readLock().lock();
lock.readLock().unlock();
lock.writeLock().lock();
lock.writeLock().unlock();
参考 并发编程 – Concurrent 用户指南
面试必问的 CAS ,要多了解